 |
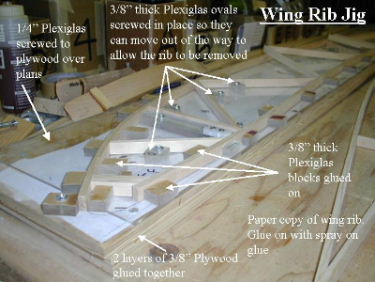
14 Aug 2001 Well its taken a long time but I have all my wing ribs built... MY WING RIB JIG: My jig is made up of two 3/8" x 70" x 10" plywood pieces glued (Elmers wood glue) together to form a rigid base. On top of this using 3M spray glue I attached the wing rib drawing that I plotted from the dimensions on the plans. I did not use the full size wing rib drawing supplied with the plans because it did not match the measurements from the plans (advice from a bunch of builders). Do not use Elmers glue to glue the wing rib drawing down. It will cause the paper to stretch, warp and have wrinkles. I should have known better but on the bright side the second time I plotted the wing rib it only took me half the time (about half an hour). When laying the paper on the plywood base, tape one end around the back side of the plywood. This way you can pull the pattern tight while it is in the air and lay it down smooth. With 3M glue you only get one chance. On top of this I have a sheet of 1/4" clear Plexiglas held down by screws (as suggested by Steve Eldredge). Using 3/8" Plexiglas I cut out 1/2" x 1/2" blocks then glued (special glue for Plexiglas) the blocks along the rib outline. I cut out spacers for the spars from this material also. It takes fewer blocks to hold the shape then you think, I have way to many on my jig but it works. The blocks should be on the inside of the bends. I initially used these non-moveable blocks to hold every thing in place but have since replaced some of them to get the pieces to slide in with out scraping off the glue. The glue will not stick to the Plexiglas and I can pop my wing rib out with out hurting the jig or rib. (Cost about 20 dollars and a 1/2-day to build including picking up the materials) When building the ribs I tried using staples to hold the 1/16" plywood gussets on but I did not like the way it looked after I removed the staples. Im too cheap to buy a bunch of clamps so here is what I am doing. I glue the rib together with out the plywood gussets. Let it dry for about 12 hours then I carefully remove it from the jig. With it out of the jig, I glue on the plywood gussets on one side of the rib. To hold the plywood while it is drying I use "Large Binder clips" that I purchased at the local office supply. They have a 1" capacity and are CHEAP compared to real clamps (5 bucks for 12 binder clips). They work great with the T-88 epoxy I am using. I can now produce great looking ribs with no holes in the plywood, I don't have to waste time removing staples and my jig looks as nice as the day I built it. After making 26 ribs I started to experience a little bit of sticking to the Plexiglas. I have to gently pry the rib off at some of the joints but is it no real problem. I think the glue has started to stick in the scratches I made while trying to clean off the left over glue. |
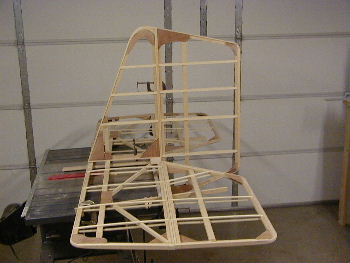 |
2 June 2001 I saw that you had immortalized me on the web. I can't believe I will be of much interest to the UK Piet people. Lately I have been trying to figure out how I can become the first person to fly a Piet across the Atlantic. My idea is to have an aircraft carrier sailing under me. I figure we will both be going about the same speed. Then I can land every 2 hours to get gas and rest my butt. I took a look at Replicrafts parts like you had suggested and I noticed he has redesigned some of the metal fittings. What is your opinion of these redesigned parts? I know the UK has redesigned elevator control horns that are approved but what about the aileron and rudder horns? Did they redesign these as well? Do you think the single piece of .090 is strong enough? Pretty much every thing that was of 2 part construction he redesigned to 1 thick piece of steel. Here is a picture of my Tail Group you can put on the site, if you want. I'm almost ready to glue on the floor plywood and pull the fuselage off the bench. It is going better then I had expected. Chris |
 |
My wife finally gave birth to our son Andrew on Sunday the 13th. I was off work all week which gave me some time to build up the nerve to start gluing the fuselage together. As you can see I decided to move the V braces to the back of the front seat, I think it looks better this way. It does cause them to interfere with where the wing attachment brackets go. I had to cut them short of this point but I was told that the V braces are for strengthening the seat so it should still be strong enough. I will be putting in plywood gussets at the top to tie the V braces into the uprights below where the wing attachment brackets go. |